Thursday, July 17, 2014

SharePoint Organization Chart with Presence

Here's a little script that - depending on your setup - will enable you to get presence icons on your Org Chart looking like this:

The Org Chart links to the users SharePoint profile page with a url like the below:
http://company.com/Person.aspx?accountname=DOMAIN\Username

In our company we all have an email address that looks like this:
username@company.com (for internal use only)

Our usernames has a fixed length, so using the scripts substr function I grap the username from the end of the url and adds the company email trail to it. It's no magic and the script is small.

You can find the script here. You'll need to modify these two variables:
   // Please modify these two variables to fit your company settings
   var companyEmail = "@yourcompany.com";
   var lenghtOfUsername = 8;

You will then need to add the script to the HTML Source portion of a Content Editor web part. Please refer to sections 11 to 16 on this blog post to see how you do that. Also note that the script refers to jQuery and SPService using external CDN's and it is highly recommended that you download these scripts and refer to them locally.

Tuesday, May 20, 2014

Who created this list or library?


How do you find out who created a particular list or library in SharePoint? It doesn’t say anywhere! Only option is to use PowerShell and that requires that you have access to the SharePoint server.

So I baked together a little script that will give you the answer.

You can find the script here. You will need to add the script to the HTML Source portion of a Content Editor web part. Please refer to sections 11 to 16 on this blog post to see how you do that. Also note that the script refers to jQuery and SPService using external CDN's and it is highly recommended that you download these scripts and refer to them locally.

Once the script has been successfully added to your page it should look similar to this


Here’s how you use it:
  1. First you need to copy the url or address of the list or library. If you have the list open you can get it from the addressbar by pressing the F6 key followed by Ctrl + C. If you are looking at the All Site Content overview, you can simply right – click it and select Copy Shortcut.
  2. Next go back to your WhoCreatedThisList page.
  3. Paste the url into the textbox by pressing Ctrl+V and then click the Search button
  4. Allow the script to work for a few seconds
  5. A dialog box will appear with the owner information
  6. If you need to save the information you can copy it to the clipboard by pressing Ctrl+C while the dialog box is in focus.

Tuesday, November 26, 2013

SharePoint survey and line spacing


If you have ever made a SharePoint survey with a Rating Scale you may have run into an issue where your questions so to speak 'flow together'.

The reason is that SharePoint doesn't add any padding to the top and / or bottom of your questions. This make them rather difficult to separate as you can see in the below example even if it's in Danish:).


There are no out of the box setting to add 'spacing' between the questions and the most common solution found on the Internet has to do with adding a script to the page that will manipulate the questions or add some styling to the table behind the questions. It's doable, but not practical.

But if you can live with a minor imperfection, here are a quick workaround:

Add one space and twenty to twenty-five underscores to the end of each option or sub-question.


This will force the dialog to insert a line break and thereby make your question more readable.


Only drawback is that the underscores will show also in Graphical Summary


That's it :)

Thursday, November 14, 2013

Searchlike filtering of lists

Watch the screencast of this blog post

When you have content in SharePoint lists or libraries you want to narrow down, you have two options: You can search and you can filter.

Search gives you the flexibility to find keywords in any part of your items columns, like in the Title, Description or in the people fields like Created By. But search rely on the Crawler and its successful schedule and the result is presented in a 'not list like' format.

Filtering is done directly on the list and therefore preserves the list look, but to filter a list you need to type the exact content of a column, not just part of it. That's because a filter by default is an Equals comparison.

With a little trick found many places on the Internet, e.g at WonderLaura, we can get the best of search and filter to work together. I'll show you my version of it with a little twist that enables you to view all items when no search filter is applied.

Let's say you have a list that contains information's about the books you have in your library and you want to be able to filter the books based on their content. In this example the list is called Team Library.

This is how it's done:

1. Start by creating a new view on your list or library for the purpose, I call mine FilterSearch and base it on the AllItems view.

2. Now on the Ribbon click List and then Edit List. This will startup SharePoint Designer
3. Once loaded click on your View in the upper right corner. NOTE: This may require Site Collection privilege dependant on your site and the setup of your masterpage. Should you get a recurring request to logon as a different user, you need to ask your local business supporter or a SharePoint Administrator person for help with steps 4 - 6. 
4. Now click on the (XsltListView) web part to mark it and then click on Parameters

5. In the Data View Parameters dialog, click New Parameter and give it a name, mine is called SearchFilter. Add a default value of the letter e and click OK.

6. Now simply hit the Save button and close SharePoint Designer


7. Back at the SharePoint list, refresh your page by hitting F5, then click Site Actions, Edit Page


8.Click Add a Web Part, choose Forms, HTML Form Web Part and click Add.


9 .You might want to Edit the Web Part and change the Title, remember to set the Chrome Type to Title Only. Here mine is called Search the Team Library.

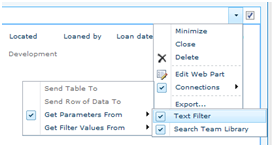
10. In your list's (again mine is called Team Library) Web Part dropdown menu select Connections, Get Parameters From, and select your web part (Mine: Search the Team Library)
11. In the Configure Connection dialog, bind together T1 and SearchFilter and click Finish.

12. Now select to Edit Web Part in the dropdown and click on Edit the current view


13. This is where we define which fields we want to search in, note that we select the condition Contains, that each filter is OR'ed together and the special syntax of the {SearchFilter}.


14. First thing you might notice when you click OK is that the list now shows up as empty. Now why is that? That's because we are requesting all the items with empty or NULL in their columns and because they have content we get nothing back. I think:-). Luckily we can apply an almost perfect workaround.

For those of you that does not have the Text Filter (below) please skip to the UPDATE section at the end of this blog post.
15. Add another Web Part, this time choose Filters, Text Filter and click Add


16. Edit the Web Part, click Advanced Filter Options and set the Default Value to something that is most likely to exist in the columns you choose to search. Unfortunately you can't search for a space, that's ignored; I found that e is almost always found in one or more columns. Period (.) could also be an option. Set the Chrome State to Minimized and the Chrome Type to None to hide the Web Part. Now click APPLY.


17. While still in Edit Mode, from the dropdown menu, select Connections, Send Filter values to, Team Library


18. In the dialog change the Connection Type to Get Parameters From and click Configure.


19. Accept the default and click Finish.


20. We now have two Web Parts that sends parameters to our list, one of them hidden. 
21. In the Ribbon, click Page, then Stop Editing.
Now the list content is showing and we can start searching (the highlighting is by me)


If you are not getting the desired results you need to ensure that the Team Library web part is getting Parameters from both Web Parts

So, that's it, enjoy search filtering!

Update

For those of you that does not have the Text filter web part available, here is a work around using only one HTML Form Web Part. 

  1. First note that step 5 above has changed and that the Parameter now has a default value of e.
  2. Edit the Page and Edit the HTML Form Web Part (or add one if you haven't got on already)
  3. Click the Source Editor... button.
  4. Replace the default html code with the code found here:
    If you have made any changes to this html code yourself you will have to redo them
Now click Save, OK and Stop Editing

So what does this code change do? First I have given the Search textbox an ID so the we can read the value of it. Once the user click GO or hits Enter we call a small function that checks if the textbox is empty. If it is empty the code sets the value to "e" and then performs the submit. Once the page is reloaded the last nameless function checks if the textbox contains only the "e" and then removes it.

Buttomline is that if the textbox is empty the code will temporary add the "e" as a default value. The drawback of this solution is that it is visible for a short time, but if you can live with that you should be good to go.


Using gantt view with the SP Calendar

A frequent need is to have calendar with an easy overview of who is absent or working out of office. The built-in SP calendar can get you some of the way, but the information tends to be a little hard to read.


I discovered that you could create a Gantt view of your calendar, but that too have some drawbacks so I decided to create a little SP Calendar in Gantt view Control Panel script.

The out of the box gantt view of a calendar looks like this if you set up Title to gantt Title, Start Date to be gantt Start Date and End Time to be gantt Due Date and remove all other fields from the view:

Not very pretty and if you try to add an entry you are likely to end up with an error because of the date time format.

So to make a long story short I searched the internet for solutions and produced a script while stealing with arms and legs. Now my calendar looks like this: 
The New button opens a modal New event dialog, Edit sends you to the Current Events list, Zoom in and Zoom out increases or decreases the detail level and finally the Today button centers the view on the current date, if possible. To make the scrollbars visible, you need to click somewhere inside the calendar. 

So, how do you set up your own gantt view calendar with the SPGanttControlPanel script? 

Let's take it step by step: 
1. Find the calendar you'll use or create a new one.
2. Open the view Current Events.


3. Right-click the Add new event link and click Copy Shortcut


4. Open a new Notepad (or similar) and paste the link for later use.


5. Go back to the view and copy the link to the view from the address bar by clicking F4 + Ctrl + C. 
6. Paste this below the other link in the notepad. 
7. Now create a new view using the Gantt View.


8.Give the view a name and select the columns


9.Set the Gantt Columns


10. Ok and ugly.
11. Now Site Actions, Edit Page.


12. Click Add a Web Part, select Media and Content, Content Editor and click Add


13. Click on the Click here to add new Content or click here.
14. In the Markup Ribbon, click HTML, Edit HTML Source


15. Grab a copy of the script here.
16. Paste the script into the editor window so it looks something like this:

17. Go to the top of the Editor window and replace the text with the two links you previously copied.
The first you copied goes to the Link2NewItem, the second to StrEditLink, remember to keep the ""


18. Click OK, then Page and Stop Editing.

Give it a try and let me know what you think!


Friday, November 2, 2012

Embed video in SharePoint 2010 blog posts - the easy way

2nd Edit: Added a link to the script file as copying from this page introduces illegal characters
NEW source file supporting multiple browsers!

Edit: Added some more explanation around the Content Editor and the script.

Embedding videos to the Body of a blog post in SharePoint has always required some tricks and coding.
If you Google the internet you may come accross posts like Embedding Flash Video in SharePoint Blogs by Kirk Evans and the ERTE project on Codeplex by Boris Gomiunik.

I've taken some inspiration in both these approaches, but wanted a solution that didn't include adding code to masterpages or installing solutions. Simplicity should be the key word. So my solution makes it possible to paste the embed code directly into the body text and hit Publish.And get the video working. To do this you simply add a Content Editor web part (CEWP) to the bottom of your page.

To edit the HTLM source of the CEWP (click Edit page and) click in the Editor part of the web part
Now in the ribbon locate the HTML icon, click the dropdown arrow and click on Edit HTML Source
Once in the HTML Source editor add the below script and click OK:

You can find the script file here: EmbedVideo.txt

Once the HTML Source editor is closed, click Page, Stop Editing.

After you done this the script should NOT show up on the page, if it does, then is has not been successfully entered into the HTML Source, examine it for any illegal characters that might occur from copying it from this page.

Once the script is successfully entered into the HTML of the CEWP you should be ready to move on!

Now you can paste the embed code directly into body text or you can even include embedded videos to items on a custom list or wherever you want...


And the result:


Or even in a custom list or as here a Link list using a Enhanced Rich Text field:

So, happy embedding :)

Tuesday, January 5, 2010

SharePoint calculated columns and variations?

I had a very spooky issue today that took me a good deal of time to resolve.

On a list in an English variation I have a calculated column called CalculatedExpiry with a formula that looks like this:
=IF(Expires="",DATE(2099,1,1),Expires)
  and that works just fine, if the Expires field is empty, it set it to 1. January 2099

I then created the same calculated column on a Danish variation of the site, but when I wanted to save it I got the "The formula contains a syntax error or is not supported."
Even though they where identical...

After a lot of testing and googling I came accross this post, which suggested to replace the commas (,) in the formula with semicolons (;) and what do you know, it works!

So in the Danish variation the calculated columns formula now looks like this:
=IF(Expires="";DATE(2099;1;1);Expires)